
Fussy Flower Tutorial
(2 versions – one with a sewing machine, and one by hand)
Mary Lecuyer; mklecuyer@hotmail.com


You will need: 1-1/4” striped grosgrain ribbon, filigree brad with colored brad in the center for the flower center, ribbon of your choice for leaves behind flower (I used pear pizazz polyester ribbon folded like the breast cancer ribbon for the blue flowers, and a strip of the striped grosgrain cut in half the long way for the brown flower).
This is going to be a longer-than-usual post....grab your chocolate munchies
.
First I want to let you know that my fussy flower was cased from Deb Horst’s shabby chic flower – I am into shabby chic lately and had to check it out: http://debhorstcreaterofsendablesentiments.blogspot.com/2010_08_01_archive.html and http://debhorstcreaterofsendablesentiments.blogspot.com/2010_07_01_archive.html. There are also 2 closeups and videos of shabby ribbon flower projects (using Vintage Vogue stamp set) and ribbon flowers by Jennifer Ingerick): http://www.stampwithjenni.com/2010/04/shabby-ribbon-flower-video-tutorial.html and http://www.stampwithjenni.com/2010/01/ribbon-flower-tutorial.html.
Read through my post here, print it off, then look at Deb's and Jennifer's posts and you will know all you need to know to make these fussy flowers!

However, when I read Deb’s directions first (and not knowing there were videos on how to make them yet) it sounded fairly simple since I have been sewing since I was about 8 years old. But sometimes what you think and what actually happens when you try to do something, it turns out to be quite different, right? So I am writing this tutorial on my take on this “fussy flower” a la Carole Anne style (http://mirrorimage.typepad.com/caroleannes-1st-blog/) – I love how she writes her posts, and shows you pictures of how her projects come out or don’t…just like you were right there with her (thanks Carole Anne for teaching me that!). I was especially pleased that I was a princess with a castle on the recent Royal Blog Tour and that I was not only in Carole Anne’s kingdom, but I was the first castle on her path!
Then on the folded side of the ribbon, you cut little slits in about ¼” apart and make sure you don’t cut the stitching that you did on the other side (or you will have to redo it all!)

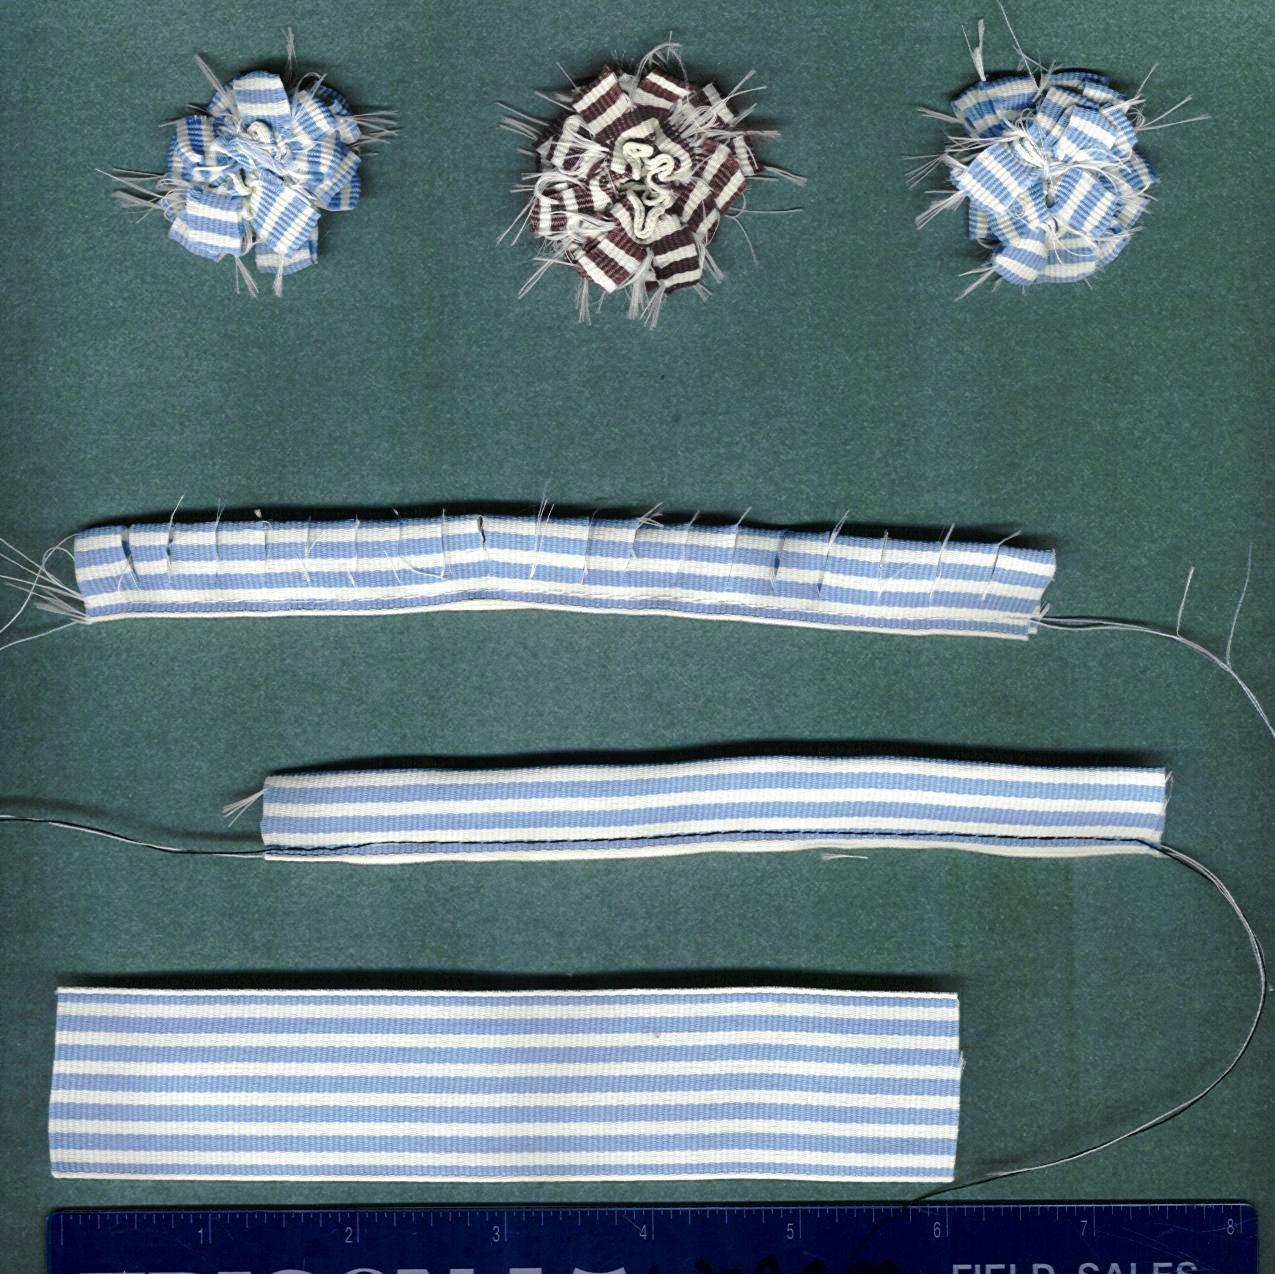
I didn’t have any problems getting this far, and according to the directions, you pull the threads and gather the ribbon up – that’s pretty standard for gathering….but look at what happened when I did that – I wanted to rush the process, which was not a good idea:

What a mess, huh?
Okay, that is not what is suppose to happen, so I figured I needed to control the gathering. I got out my straight pins and a piece of cardboard to use to hold the gathers down. As I gathered each section, I stuck a pin into it on the cardboard so it didn’t get all twisted up.


I carefully continued gathering and pinning (or moving the pins) – I had to be careful and not pull the thread too hard because it might break, and then I would have to start all over again (believe me, I know from experience – some of you will relate to this!!)


Hmm, this strategy seemed to work pretty good, although it was slow and tedious – I ended up with 2 little blue flowers shown in my pictures.


I carefully tied the thread ends together and then tacked the 2 ends together. See how the little slits you cut fray and cause little threads to stick out in a shabby-like way? Kinda like the messy touseled hair ponytails?!

Well, the seamstress in me said there was another way that might work, that was not so “fussy” (lol); so I got out my heavy-duty thread (I used quilting thread) and a longer than usual needle (which can stitch more fabric easier with the in-and-out technique without pricking your finger lol). This fussy flower will be a brown-striped flower.

In this version by hand, I ran a running stitch along the non-folded side about 1-2”, then stopped and cut the little slits, then I pulled the threads tight to gather the ribbon – that’s where the heavy-duty thread comes in real handy – you don’t have to worry about the thread breaking!

I continued to make the stitches, cut slits, and then gather every inch or so…

See, I got to the end of the ribbon and it has curled into a circular shape and it is all all gathered. But now it’s not closed up tight into the flower shape like the blue flowers. That is easy to fix!

I just folded the flower in half so it is doubled up – it is folded in half on top of the other half – double layered. Now I don’t have to tie those little threads together either; can you see the needle is still attached with the thread to the flower?

I took my needle and stitched the ends of the flower ribbon together and then anchored them (sewed 2 knots with my needle) – I also did a couple stitches in the center to anchor the top half of the ribbon to the bottom – I knew the center would be covered up with something (like a brad, button, etc.) so the stitches would not be obvious.

Gee, I think the brown fussy flower came out really well, and it was definitely easier to make – not as fussy as the blue one…lol... But they are both really cute, don’t you think? So now you can try making your own fussy flower! It’s only the first and second time you make it that it takes longer, then it’s pretty simple! Imagine all the different projects you can use these cute flowers on! And you have videos you can look at that will help you, and print off this tutorial to refer to as you make them….
I would love to hear any feedback and/or suggestions you might have on improving these versions, and what helpful things you did in making your flowers - any pictures/links would be great too!
P.S. Here's a new online crafting magazine you might want to check out - free downloads of issues: http://www.papersandpixels.com/ - created for digital and paper scrappers, card makers, and anyone who loves to create their own gifts
(Sandi MacIver is on the team! bow wow)
Thanks for coming by! I will be working on my other tutorial for the lace and ribbon weaving this week...
Wow! Thanks for sharing the details Mary. Think I'll wait for a snowy day to try this. That seems to be the only time I get out needle and thread - LOL! Looks like fun and worth the work though.
ReplyDelete