Friday, December 31, 2010

Last "family" holiday card for 2010; Happy New Year; last day to order from mini-catalog Jan 3

Another year is almost over, wow....just wanted to post a few last pictures!  Since some of you might have gotten snow for Christmas, this snowman cookie is for you!  It's all natural ingredients (yogurt, etc.) but if you look at the snowman's buttons, you will be able to see who this cookie was for! 

Yep, it was for our furbaby....and she absolutely loved it!  She ate it all up on Christmas day.  Isn't she a cutie?  Her fur is soft and silky, since she gets cleaned with doggy wipes and brushed every night before she goes to bed.  What fun we will have on New Year's Eve because we are going to our first owners and dogs' New Years Eve party - pizza for the owners and a fun run for the dogs at the indoor dog agility site we go to for classes. 
I will post some pics later!


To wish you a Happy New Year,  I'm posting and dedicating my last 2 cards made of the year to you all!  It has a family theme and I thought the saying on it was very appropriate to reflect how family and friend memories are - "Carpe diem!" I say (Latin for "seize the day")  Can you see the difference between these 2 cards?  The bottom half of each card is slightly different.  I used Stampin' Up's embossing folder called Vintage Wallpaper, but before I embossed the cardstock, I brayered white craft/pigment ink on one side of the folder.  For the other card, I brayered the other side of the embossing folder - Can't decide which one I like the best....There is a little rhinestone at the top of the tree, along with an antique brad, tinsel trim, and striped grosgrain ribbon (I love that ribbon).

The last day to order some of these Stampin' Up products featured in the holiday mini-catalog is Jan. 3rd - let me know if you want to order anything from it - you can download and view the catalog if you click on the picture of it to the left of my blog....

From our house and furbaby, to yours and your pets, be safe and have a Happy New Year! 

Sunday, December 26, 2010

2 more handmade gifts-stamped bags for dog owners


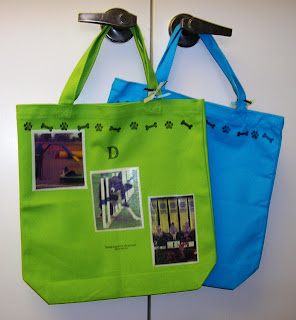
I just had to share these neat bags that I stamped on for our furbaby's dog agility teachers - I took a chance that the Stampin' Up stazon inkpad would work on them and used the D is for dog set.  Then I heat set the pictures and they came out great!   I got some pictures of our teachers' dogs and printed them out on our computer with that special paper that allows you to iron them onto a tee shirt.  But since the bags were colored, I ironed them on white fabric first, then used fabric iron-on adhesive to adhere the pictures to the bag (you can get that from Stampin' Up too).  Here are a few more pictures of the bags.

Friday, December 24, 2010

Merry Christmas to you, from our Aflac duck collection


We started a new family tradition with my husband and furbaby - actually we started our traditional Christmas collection several years ago when he worked for Aflac....These plush ducks are soooo cute - maybe you've seen the tv commercial (Aflac!!). 


There is no way you can't hold and squeezy one of these soft cuties and not smile! We're up to 2 shelves now!!  We almost didn't get one this year because they sold out, so we called several Macy's and finally were able to buy both a big one and a little one - that was a close call - can't break up the duck family!!  lol 
The duck with the light blue hat and scarf is this year's duck. 


One year everyone got an Aflac duck for their Christmas presents! BTW, proceeds from the sale of plush Aflac ducks on this site go to the children's Aflac Cancer Center and Blood Disorders Service.


Look at that duck in the front dressed like a Christmas tree! 
Enjoy and Merry Christmas!!


Gifts, Presents, or Presence?


Whether you have wrapped all your gifts for Christmas giving, or are finishing them up today, wrapping presents can be fun if you are a little bit creative. I got an early start in gift wrapping, since one of my job tasks in my first real job at age 16 was to wrap customers’ gifts. The owner had an awesome tool that made beautiful bows, but the trick was to practice pulling out the loops so you ended up with a fluffy bow. By the time my part-time after-school job ended, I could quickly and efficiently wrap gifts and tie on attractive ribbons and bows. My mother would ask me to wrap the family’s Christmas presents because I was pretty fast, and told me, “don’t look in that box; that’s your present!”


So Christmas presents have become one of my favorite times to use a theme to wrap all the gifts in – I would choose a color theme and then buy only gift-wrapping papers, ribbons, and tags in those colors. Color themes I’ve had fun with have been lime green and pink, purples, silver and gold, red and green…When I became more interested in papercrafting, I started making some of my own papers, tags, and designing ribbons. Here are some pictures of my last year’s presents – can you see what my “theme” was?


Here are some of the presents I wrapped for this year – one theme is masculine,
and the other is feminine.


With the internet, there are oodles of ideas for making last minute items to wrap presents with, as well as unconventional gift wrapping ideas, alternative gift wrapping, and stylish DIY gift wrapping – I am such a packrat and hate to throw away pretty things that might come in handy to put on a present…recycle them! But buying things post-Christmas that you can use on presents is great too – this year I used snowflakes and snowmen.


When I think of gifts and presents, I am reminded by that saying, "The clock is running. Make the most of today. Time waits for no man. Yesterday is history. Tomorrow is a mystery. Today is a gift. That's why it is called the present." Out of curiosity, I checked online to see who is credited with saying that….can you believe it, not only were there several slight variations of it, it has been quoted by several folk, among them was Eleanor Roosevelt, Bill Keane (the cartoonist), and even someone named Babatunde Olatunji (??). The saying supposedly comes from an ancient phrase and in “modern English,” it is: "the tide abides for, tarrieth for no man, stays no man, tide nor time tarrieth no man" (http://www.phrases.org.uk/meanings/38400…).


As far as the “presence,” I enjoy the holiday “presence” and “presents” – I love designing and putting together “presents”…making each one special for just that person…having the recipient think for just a minute before tearing it open, “oh, it’s too pretty to unwrap.” And hope that the gift I wrapped makes them not only feel special for that instant, but that they can sense my “presence” in the way I designed the “present” just for them. This quote pretty much summarizes my thoughts on presents: “The manner of giving is worth more than the gift” (Pierre Corneille, Le Menteur; retrieved 12/18/10, from http://www.quotegarden.com/gifts.html).  Hope you will take a second look at some of those pretty presents you might receive!

Thursday, December 23, 2010

Our Christmas decorations inside and out


Wanted to share our Christmas decorations that we have put up - I took pictures of them so put into the 2 little Christmas albums I sent to my family - the red and green albums I posted about previously, and realized I didn't share any of our Christmas decorations!  Since we have a furbaby, you will see some decorations that are dog-related!


No snow here - won't get any either, other than the little wooden snowman to the right of the door....I can look at lots of pictures of it, and have lived for most of my life where there was always snow.  I have to say I am enjoying only looking at the pictures now lol!

Wednesday, December 22, 2010

Calendar bookmarks to enclose with Christmas cards

This year I decided to do something a little different with my Christmas cards (yes, I make them too!) - besides cutting back on how many to send, I wanted to let my family and a few special friends know I think about them....and give them something to remember that throughout the year.  So I made up some calendar bookmarks to enclose with their Christmas cards.

Monday, December 20, 2010

Busy weekend: Dog practice, Santa pics, Christmas gifts


 It was a busy last-weekend-before-Christmas!  I put together 2 mini-photo albums for gifts for family... Our furbaby, Inu, was in several of the pictures - part of the family of course!!  Here are the 2 albums, red and green, and Inu is on the last page - don't you just love taking pictures of your furbaby....Got the gifts wrapped and packaged up to be mailed to family tomorrow, thanks to lots of help from my hubby.

So of course, we had to take Inu to get her picture taken with Santa too

Thursday, December 16, 2010

Lace and ribbon weaving technique tutorial downloaded & available!

Lace and Ribbon Weaving Technique tutorial now available! 
http://www.scribd.com/doc/45480879/Lace-and-Ribbon-Weaving-Technique-Tutorial


My tutorial was featured in the Dec. 2010 issue of Papers and Pixels this week (yay!)....This technique is where 2 kinds of flat crochet trim laces and 2 kinds of ribbon (narrow 1/8" taffeta and 5/8" satin ribbons by Stampin' Up) are woven on a piece of cardstock, resulting in a beautiful lace & ribbon woven 6" x 6" piece that can be used in a project. 
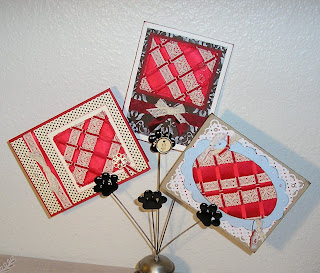
Here are pictures of 3 projects I previously posted using marina mist 1/8" taffeta ribbon, 5/8" very vanilla satin ribbon, Victoria crochet trim lace, and Chantilly crochet lace trim
(by Stampin' Up).


Here is what the 6" x 6" lace and ribbon woven piece looked like
before I cut it up for these projects:


Here is the lace and ribbon weaving technique in red that I made for my article in Papers and Pixels, and the 3 projects made from it.


If you didn't get to subscribe to Papers and Pixels in time to get the first edition of the Dec. online publication, and just can't wait for the second edition, I have downloaded my tutorial that was featured in it at this link:

Not only can you download and print off your very own copy of this tutorial, you can also download and print the 3 projects tutorial that use this technique:


If you did paper weaving or making those weaving loopy potholders when you were younger, this technique is very similar to it - Have fun!!  Would love to see your projects using this!


Wednesday, December 15, 2010

Lace and ribbon weaving technique tutorial in Dec. Papers and Pixels

Today the December issue of Papers and Pixels came out! 
And my tutorial I said I was writing for the lace and ribbon weaving technique I used on previously posted cards (the Nov. Royal  Blog Tour and Oct. Sudsol Blog Tour)
was featured!   Woot

Above are 3 projects that I designed with this tutorial as well and below is a picture of the Dec. cover of Papers and Pixels.  If you look on the left hand side where the names of the articles are, the 7th article says "Reader submission - Lace and Ribbon."  That is where you can get the tutorial for the lace and ribbon technique and
read all about it (and me). 
Here is their website:  www.papersandpixels.com


I hope you were able to sign up for their edition mailings, so this issue will be in your email mailbox. If not, you can sign up for the second mailing of the Dec. edition which will go out Dec. 18th.


I also designed 3 shabby chic-like projects using the lace and ribbon technique tutorial. You can go to this link for the tutorial for the 3 projects (it is 12 pages long): http://www.scribd.com/doc/45317753/LaceAndRibbonWeavingProjects1to3-12pages


All products used were Stampin' Up.  I would love to read any comments and feedback you might have on the lace and ribbon weaving technique
and the 3 projects!   And especially see any projects you made using this technique!!

Next month I will also provide a link to the tutorial on the lace and ribbon technique
after I have downloaded it.  Thanks for coming by!

Tuesday, December 14, 2010

Masculine In Wilderness Mug of Truffles; my buffalo story

Today I made a Christmas gift for my hubby - well, actually it will be from our furbaby to her "daddy!"  It was for a challenge on Sudsol for Christmas gifts or boxes you had made...Since my husband loves the outdoors, I thought the In Wilderness stamp set by Stampin' Up would be appropriate - I had this mug where you can decorate the paper between the outside and inside. 

Saturday, December 11, 2010

Christmas pics with digital camera; our dog

Trying my digital camera today!  You can see the tinsel trim on the bag and middle tag, the embossing on the red tags, but not the rhinestone on the JOY or green treetop - will have to see what I can do about that.  When I scan things in my computer, often you can see these little details better.


The red dot in the middle of the gold ornament is a red pearl,

Monday, December 6, 2010

Christmas treat bags for the dogs and cats

I have been busy making Christmas treat bags for dogs and cats!  I was able to use quite a bit of my retired Stampin' Up papers and ribbons - the pink and purple ones are for the girl dogs and cats.  The tops of the bags are the Top Note diecut. 
Aren't they cute? - they look like little purses and you can hang them on your tree.

Wednesday, December 1, 2010

Christmas craft class kits still available - get a free gift too!


 You can get this snowflake free!!  Not only are there spots available in my Christmas craft class this Sat. (Dec. 4 at 1 - 3 pm), I also have kits-to-go available. 
You will receive a free gift too - the snowflake bookmark clip that is shown above. 
For $10 you will make 10 gift tags, 6 cards, and decorate a cute bag to put them all in.  I will provide everything you need.  Just come and have some fun and make a lovely gift for someone - or keep!   

Here are some pictures of the projects that are similar to what you will be able to make - and I will help you!


If you can't come to the class, you can buy the class in a kit-to-go.  All the supplies will be prepared for you to put together at your convenience. 
Wouldn't this be a great project for your grandchildren to do when they come over to visit you? 

Here is the little bag you will be able to decorate: 


Just send me an email if you would like to come to my first monthly craft class or get the kit-to-go OK?  Thanks for stopping by!

Friday, November 26, 2010

Shabby chic red and plum gift tags - more details

This week I made 7 gift tags for a swap (got some ideas on putting these together from the Sept. to Remember event in AZ recently where we made a whole box of gorgeous vintage tags) - although all the tags I made were similar, there were some slight variations between each one - because I had a hard time just choosing which of the pretty hearts I wanted to put on them lol.  You can see the differences in the 3 tags
pictured below:


There was little stamping involved,

Swap card received; swap tags made; Christmas craft class reminder

Hope you all had an awesome turkey day!!  I love this time of the year, because of all the yummy food!  I had to share this card with you. 
I received it in a swap for the group for Arizona stampers.  The leaves, greetings (heat embossed to make it really glossy I think), and little square brads are all in copper metallic and it is very elegant!  I am still working on being able to take decent photos of projects with metallic and bling on them...And on this card, the Stampin' Up jumbo stamping wheel was used with the Bright Blessings (p. 28) -

Wednesday, November 24, 2010

Swirling snowflake card out of recycled items: Foil, soda can, leftover lace and trim

There is just something about shiny foil I like, so when I found out I could use my Stampin' Up punches on foil, I had to try them out!  Then when I learned that in order to sharpen your punch, you punch using a flattened soda can (but have to be careful until the soda can is punched, because it is sharp - so I had my husband cut and flatten the cans).  Once you punch out a design from the soda can, it is not sharp anymore....I just got my snowflake punch and of course, I had to start punching snowflakes out!  I used the presto patterns designer paper (because it has white shiny designs on it), and gold and silver cardstock, and in this picture above, I "sharpened" my punch to make a soda can snowflake.  Actually, this snowflake is the inside of the soda can, since I didn't want the soda can design on it and the inside of the can is a more subtle shiny.  I wrapped a little piece of black lace around the snowflake center and then tied it, leaving the ends longer so it would look like a flying snowflake.  And I also tied a bit of the clear tinsel trim in the center to give a little more dimension to the swirling flying snowflake.

I had just gotten the Northern Flurry embossing folder,

Sunday, November 21, 2010

Thanksgiving and Fall leaves cards - 2 versions


This week I made some Thanksgiving cards with fall leaves on them - I used the little leaves and swirls Stampin' Up diecuts, and the square lattice embossing folder - The cute pumpkin is from the Paisley Prints and was really easy to do. 

Saturday, November 20, 2010

Lace and ribbon weaving cards tutorial - guess what?!

These are 2 mini-cards with matching envelopes I designed and made recently - I featured the one on the bottom with white edging in the Sudsol blog tour earlier this month.  The card on the top is different in that I used the azul distressing inkpad from the Stampin' Up distressing kit on the edges, and so made the envelope from the darker blueberry crisp designer paper.  I also colored the little pearls on the shoe with a blue sharpie.  When I made the lace and ribbon weaving section, I had some left over, so made another card out of it for the Royal Blog Tour, which was just after the Sudsol blog tour.  See, here is the card I featured for that blog tour:

And I said I would do a tutorial on my lace and ribbon weaving technique.  And I will be working on that, but guess what happened about that?  Remember I shared the new online paper craft magazine in a earlier post, called Papers and Pixels?   I was so intrigued by it, and so submitted the darker lace and ribbon weaving mini-card to them to be considered in a future issue.....and I was accepted!! 

I am going to not only prepare a step-by-step tutorial on this technique, but design a different version of it just for them!