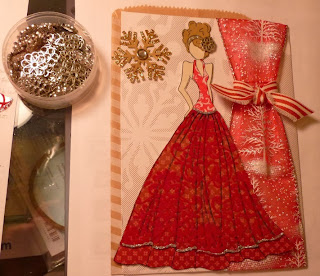
Stampin' Up retired velvet flocked paper, striped grosgrain ribbon, snowflake punch, star punch, glitter glue, brad, rhinestone brad in snowflake; current Stampin' Up kraft bag, glue on rhinestones, and gold glitter paper for snowflake and stars. Other paper used for her gold metallic hair and pale pink metallic paper for skin. Wired ribbon was bought on sale one year at a local craft store.
Prima doll stamp (Lorena)
Stampin' Up bags - you can buy these tag a bags for $3.95 in my online store (you get 10 bags).
Make up the top layer of the bag paper first so the glued ribbon ends and brad ends won't show...
You can get the Stampin' Up champagne glitter paper 12 x 12/two sheets for $4.95 in my online store - it's a nice not-too-heavy weight that is not flimsy.
Now put tape on the insides of the card and place your bag on it.
Front and back of glued designer paper to bag
After you cut out your doll's parts and put her together, apply glitter glue to her headband.
Apply the glitter blue to the bottom of her skirt overlay too.
Put glitter glue at her waist after the overlay is adhered.
Glue a fancy flat brad to the side of her headband.
Glue a tiny rhinestone to the center of the brad (could use a flat fancy button instead of the brad). These are current Stampin' Up glue on rhinestones and I find they stick better than other similar ones.
Cut/punch a few glittery stars and glue them on the front.
Now you can put something into the bag!
Here is another variation I did with the red and white velvet flocked Christmas papers and the Lorena Prima paper doll stamp - it has velvet ribbon, and a fluffy white glittery ribbon with a mini-bell attached.
The flat fancy brad was put at her waist and has a red colored pearl in the center of the brad.
Thanks for stopping by and visiting my Prima girls!


