I wanted to share a few more pictures of the cards we made for my second monthly card class - still trying to find the best setting(s) and locations for good photographs with my new camera....
All supplies are Stampin Up - the milk carton diecute for the birdhouse to match the card and the new designer paper Natural Composition that looks like wood - and of course, the
cute bird punch.
We used baker's twine for the card and one retired Stampin Up designer paper that I was hoarding (lol) and those retired little closepins. Gee I remember using the real ones to help my mother hang up laundry on the clothesline she had down in our basement! And she had this adorable clothespin bag that hung on the lines she had made that was in the shape of a dress - I loved that blue and white clothespin holder....
This card uses the Raining Flowers and lots of pop up dimensionals (one lady called them "risers!" how original and descriptive). It was cased from the catalog on p. 73 along with the Floral District designer papers - there are so many beautiful cards in both the annual and holiday catalogs that I want to CASE...
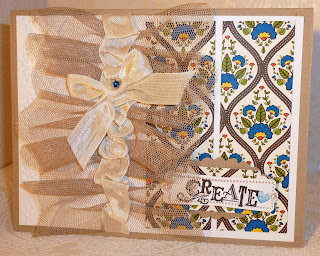
This card was based on the very vintage swap cards I made for Stampin Up's Convention that I went to last month - it uses the beautiful new tulle in the holiday catalog and International Bazaar designer papers. I have to admit I wasn't all that crazy about this paper, at first....but it grew on me! I am putting a few more photos of the very vintage swap card making details at the end of those post, where I made double tulle ruffles.
This tulle is way more gorgeous in real life!
This is a vertical Z-fold easel type card and the design is cased from a card that was in the demonstrators' July Stampin Success newsletter. I love the way the Delicate Doilies were used to stamp on the paper daisy and how the vintage faceted designer button adds some sparkle to it. And that is the International Bazaar designer paper used again!
Here is the very vintage swap card I made - it is embossed on the left with one of the Delicate Designers embossing folder - the entire card is sponged with Soft Suede to make it
look vintagey.
The pearls were colored with a turquoise Sharpie pen, and I used the ink reinkers to make the seam binding ribbon look antiquey...
I used the sticky tape for the first layer of tulle ruffles, then another sticky tape strip to hold the second layer of tulle ruffles on.
Here is the very vanilla seam binding ribbon pile - I completely wet the ribbon and crinkled it all up so it looked scrunched up; then after letting it dry like that, I dropped some reinker into a plastic bag with a little water, added the ribbon to dye it with antique effects from the ink. Smushed it around in the plastic bag and then I just let it dry outside; since it is pretty arid and warm here in Arizona, it dried up quickly! Lately it has been in the triple digits for temperature (yes you heard me correctly, triple digits like 115 degrees! We are actually getting used to it even!
After I tied the ribbon on the card, I cut a little piece of the tulle and tied it over the knot - can you see it in this picture?
A couple of the swappers commented that they thought my card was great - that made me feel so good because it told me they appreciated the extra time and work I put into my cards :-)
And I even got a couple emails from the other swappers after Convention telling me they liked my card - thanks a bunch for letting me know!!


