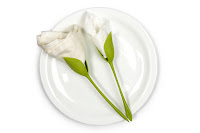
Tutorial for
folding napkin into a flower (rose, tulip,
calla lily, rosebud, or amaryllis)
using the
plastic flower holder
Compiled by Mary Noble, PhD
I purchased 8 of the plastic flower holders that
you can find all over the internet, but was disappointed that they did not come
with any instructions or any photos on how they should look. Therefore, I used my research skills together
to put together a tutorial on how to fold the napkins in various ways so they
could be put into these holders. If you would like me to email this tutorial to
you, you can send me an email at mklecuyer@hotmail.com for the Tutorial
for folding napkin into a flower using the plastic flower holder.
In addition to paper napkins and regular cloth
napkins, it may be possible to make the flowers (rose, tulip, calla lily,
rosebud, or amaryllis) from lightweight, flexible papers or other types of
fabrics….? If you do this, it would be
great to share these creations with others, so feel free to email me pictures
of yours and any comments you might have!
Since I am a Stampin’ Up demonstrator, I plan on trying some of the
papers with these holders…maybe vellum, envelope papers, ribbon…?
The holders are advertised on various websites
as: Plastic holders that transform your
napkins into flowers! These holders work
with paper napkins, but they also work with cloth, providing it’s not
banquet-size.
Shown below are some pictures from the many videos
I found online on how to fold the 6.5” x 6.5” napkin in half, at an angle, or
on the diagonal for the flower napkin holder (taken from various facebook pages
as they are sold by several different companies – I have left the webpage’s
identifying address & info on the pics so you can locate them; more photos
are also shown on Pinterest). Basically
you fold and/or pleat the napkin, insert it into the holder, then twist the
holder to roll the flower. Two visual
summaries of the napkin folds are at the end of this tutorial.
First napkin is folded in thirds (not in half as
it stated)
As you roll the holder, you will need to stop
occasionally to straighten the napkin ends out so they are the same on both
sides (see below for pictures of this):
Since this tutorial is very long, I was unable to post the rest of it here so if you would like the entire lengthy tutorial, please email me at mklecuyer@hotmail.com and I will be glad to send it to you!
Hope
this tutorial helps you to enjoy the napkin folder holders more! I plan on trying some of my Stampin’ Up items
that are sold in my online store (http://www.stampinup.net/esuite/home/marynoble) with this holder in the future, so check back
and/or follow my blog for them; thanks!
Here are 2 quick visual summaries on the folding that might also be helpful:


